> ## Documentation Index
> Fetch the complete documentation index at: https://docs.claimr.io/llms.txt
> Use this file to discover all available pages before exploring further.
# Test users
> Grant specific users test access to a campaign so your team can safely preview quests, tasks, and rewards without affecting live data.
Test users in Claimr are specific user accounts that you designate within a campaign, granting them special access or permissions primarily for testing purposes. This feature allows you to add team members or real users to interact with your campaign in a controlled environment, often before it's launched to the public or while testing new configurations.
## Why use test users?
Adding specific users as testers before or during a campaign is crucial for ensuring a smooth experience. Use the Test Users feature to:
* Thoroughly test your campaign's quests, tasks, rewards, and overall user flow.
* Identify potential bugs, errors, or usability issues with feedback from a select group.
* Allow team members or real test users to preview and experience the campaign without affecting live user data or analytics.
* Safely test specific conditions, edge cases, or integrations.
* Gather valuable feedback on the campaign experience from a trusted group before a wider release.
## Access the Test users section
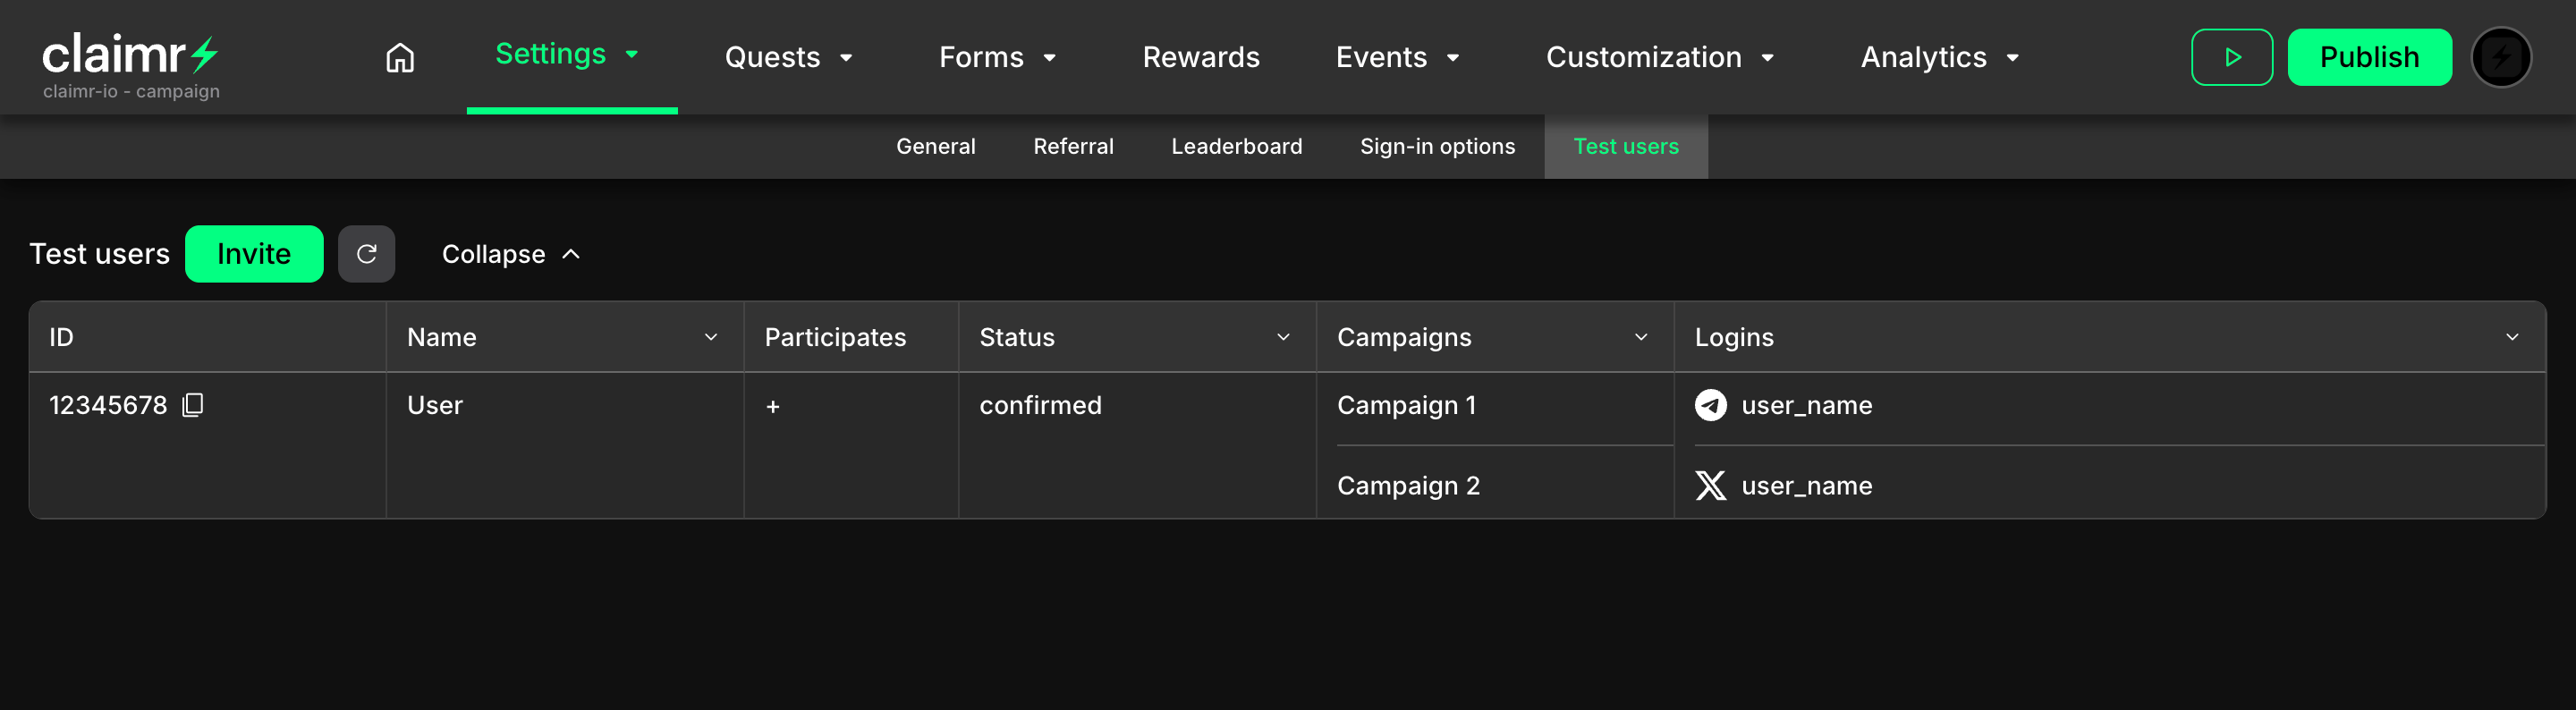 1. Log in to your Claimr account.
2. Select the **Campaign** you want to add test users to.
3. Navigate to the campaign's **Settings** section.
4. Select **Test Users** from the settings menu or sidebar.
## Add a test user
Adding a user to the test group involves two main parts: the user getting their unique ID, and the campaign manager adding that ID in the settings.
The person you want to add as a tester must first retrieve their unique Claimr User ID for that specific campaign. Provide them with these instructions:
1. Open the specific campaign you need to test.
2. Once the widget is loaded, click repeatedly (several times) anywhere on the screen or widget area.
3. A pop-up message should appear confirming: "User ID successfully copied". This copies their unique ID for that campaign to their clipboard.
4. Send this copied User ID to the campaign manager.
1. Log in to your Claimr account.
2. Select the **Campaign** you want to add test users to.
3. Navigate to the campaign's **Settings** section.
4. Select **Test Users** from the settings menu or sidebar.
## Add a test user
Adding a user to the test group involves two main parts: the user getting their unique ID, and the campaign manager adding that ID in the settings.
The person you want to add as a tester must first retrieve their unique Claimr User ID for that specific campaign. Provide them with these instructions:
1. Open the specific campaign you need to test.
2. Once the widget is loaded, click repeatedly (several times) anywhere on the screen or widget area.
3. A pop-up message should appear confirming: "User ID successfully copied". This copies their unique ID for that campaign to their clipboard.
4. Send this copied User ID to the campaign manager.
 Once you (the campaign manager) have received the User ID from the tester:
1. Navigate to the **Test users** dashboard for the relevant campaign (go to campaign **Settings → Test Users**). You will see a list of any users already added as testers.
2. Click the **Invite** button.
3. The **Invite test user** modal window will appear.
Once you (the campaign manager) have received the User ID from the tester:
1. Navigate to the **Test users** dashboard for the relevant campaign (go to campaign **Settings → Test Users**). You will see a list of any users already added as testers.
2. Click the **Invite** button.
3. The **Invite test user** modal window will appear.
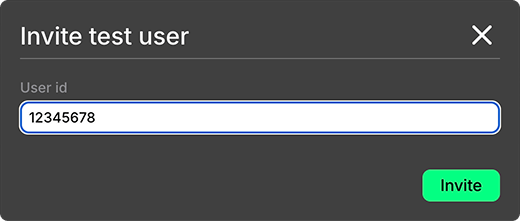 4. Paste the User ID provided by the tester into the **User ID** field.
5. Click the green **Invite** button in the modal window.
## Invitation status and the user's confirmation
### Manager's view: invitation sent
4. Paste the User ID provided by the tester into the **User ID** field.
5. Click the green **Invite** button in the modal window.
## Invitation status and the user's confirmation
### Manager's view: invitation sent
 Once you click **Invite**, you will see:
* A new entry for the invited user appears in the **Test Users** table on your dashboard.
* This entry will show the user's **ID**, **Name** (if available), and initially, the **Status** will be set to `created`.
**Understanding statuses**: there are three possible statuses for a test user invitation:
* `created`: The invitation has been sent, awaiting the user's response.
* `confirmed`: The user has accepted the invitation via the widget.
* `rejected`: The user has declined the invitation via the widget.
### User's view: accept the invitation
After the manager sends the invite, the invited user needs to confirm.
The next time the invited user opens the specific campaign widget, a pop-up notification will appear asking them to join the test group. This pop-up will have two buttons: **Reject** and **Confirm**.
Once you click **Invite**, you will see:
* A new entry for the invited user appears in the **Test Users** table on your dashboard.
* This entry will show the user's **ID**, **Name** (if available), and initially, the **Status** will be set to `created`.
**Understanding statuses**: there are three possible statuses for a test user invitation:
* `created`: The invitation has been sent, awaiting the user's response.
* `confirmed`: The user has accepted the invitation via the widget.
* `rejected`: The user has declined the invitation via the widget.
### User's view: accept the invitation
After the manager sends the invite, the invited user needs to confirm.
The next time the invited user opens the specific campaign widget, a pop-up notification will appear asking them to join the test group. This pop-up will have two buttons: **Reject** and **Confirm**.
 * **If the user clicks `Confirm`**: They are officially added as a test user for this campaign and can participate according to any special rules or access you have configured for testers. Their status in your Test Users list will update to `confirmed`.
* **If the user clicks `Reject`**: They decline the invitation, their status in your Test Users list will change to `rejected`, and they will *not* become a test user. The invitation process would need to be restarted if they change their mind.
## Test users' table
Once a user clicks **Confirm** in the widget pop-up, their **Status** in your Test Users dashboard updates to `confirmed`. They are now officially a test user for this campaign, and you can see their complete record in the table.
* **If the user clicks `Confirm`**: They are officially added as a test user for this campaign and can participate according to any special rules or access you have configured for testers. Their status in your Test Users list will update to `confirmed`.
* **If the user clicks `Reject`**: They decline the invitation, their status in your Test Users list will change to `rejected`, and they will *not* become a test user. The invitation process would need to be restarted if they change their mind.
## Test users' table
Once a user clicks **Confirm** in the widget pop-up, their **Status** in your Test Users dashboard updates to `confirmed`. They are now officially a test user for this campaign, and you can see their complete record in the table.
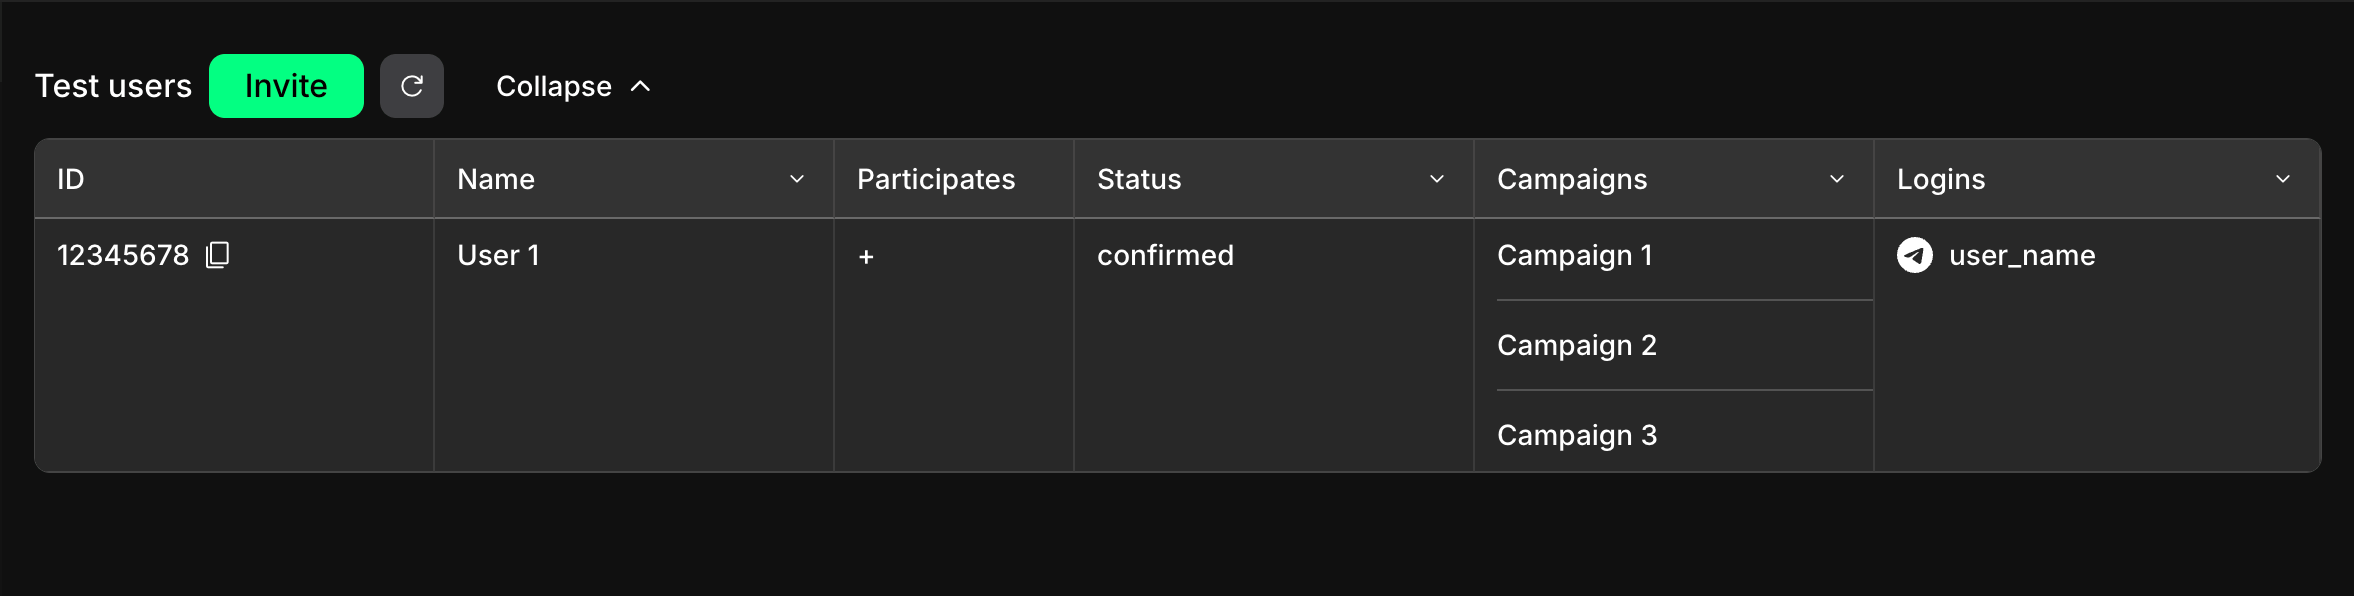 Table columns meaning:
* **ID**: The test user's unique Claimr identifier (the same ID they copied from the widget). You can click an icon next to it to copy the ID again.
* **Name**: The user's display name, typically taken from their primary connected account or first login method used with Claimr.
* **Participates**: A **+** (plus) sign indicates the user is actively participating as a test user in the specific campaign you are currently viewing. A **-** (minus) sign would mean they might be a test user in other campaigns within your organization but not this one. This helps manage testers across multiple campaigns.
* **Status**: The current state of their test user invitation: `confirmed`, `created`, or `rejected`.
* **Campaigns**: Lists the names of all campaigns within the organization that this user is participating in (as a test user).
* **Logins**: Shows the different accounts or login methods the user has connected to their Claimr profile (e.g., Discord username, X handle, wallet address).
## Test user's details
To see more detailed information about a specific test user:
1. Click on the row corresponding to that user in the **Test Users** table.
2. A detailed information drawer will slide out from the right side of the screen.
### General section
Displays the fundamental information about the test user.
Table columns meaning:
* **ID**: The test user's unique Claimr identifier (the same ID they copied from the widget). You can click an icon next to it to copy the ID again.
* **Name**: The user's display name, typically taken from their primary connected account or first login method used with Claimr.
* **Participates**: A **+** (plus) sign indicates the user is actively participating as a test user in the specific campaign you are currently viewing. A **-** (minus) sign would mean they might be a test user in other campaigns within your organization but not this one. This helps manage testers across multiple campaigns.
* **Status**: The current state of their test user invitation: `confirmed`, `created`, or `rejected`.
* **Campaigns**: Lists the names of all campaigns within the organization that this user is participating in (as a test user).
* **Logins**: Shows the different accounts or login methods the user has connected to their Claimr profile (e.g., Discord username, X handle, wallet address).
## Test user's details
To see more detailed information about a specific test user:
1. Click on the row corresponding to that user in the **Test Users** table.
2. A detailed information drawer will slide out from the right side of the screen.
### General section
Displays the fundamental information about the test user.
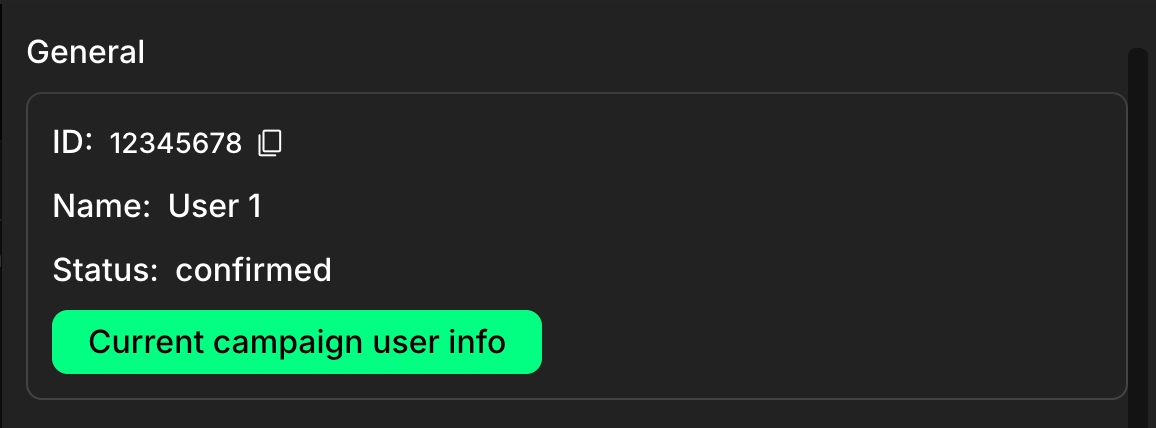 * **ID**: The user's unique Claimr identifier.
* **Name**: The name associated with the user account (often from their first login).
* **Status**: The current invitation status (`confirmed`, `created`, or `rejected`).
* **Current campaign user info button**: If the test user *is* actively participating in the campaign you are currently viewing (indicated by a `+` in the **Participates** column of the main table), this green button will be visible. Clicking it opens another dashboard showing details about this user's specific activity, points, and status *within this particular campaign*. This button will *not* be displayed if the user is not currently a participant in the campaign you are viewing.
### Logins section
Lists all the external accounts and login methods the user has connected to their Claimr profile.
* **ID**: The user's unique Claimr identifier.
* **Name**: The name associated with the user account (often from their first login).
* **Status**: The current invitation status (`confirmed`, `created`, or `rejected`).
* **Current campaign user info button**: If the test user *is* actively participating in the campaign you are currently viewing (indicated by a `+` in the **Participates** column of the main table), this green button will be visible. Clicking it opens another dashboard showing details about this user's specific activity, points, and status *within this particular campaign*. This button will *not* be displayed if the user is not currently a participant in the campaign you are viewing.
### Logins section
Lists all the external accounts and login methods the user has connected to their Claimr profile.
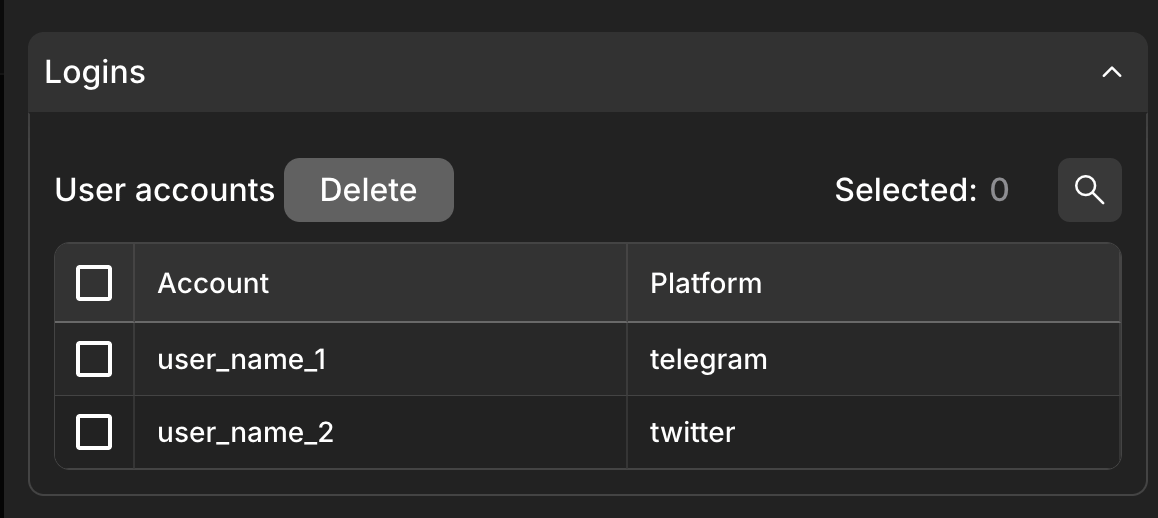 * **Account**: The username, email, or address associated with the login.
* **Platform**: The type of login (e.g., `discord`, `email`, `web3`, `x`).
The **Delete** button allows you to remove linked accounts, but note that a user must always have at least one login method remaining connected to their profile. Consequently, the **Delete** button will not be displayed next to the last remaining account.
### Entries section
Shows a list of all campaigns within your organization that this user is participating in (as a test user or regular user).
* **Account**: The username, email, or address associated with the login.
* **Platform**: The type of login (e.g., `discord`, `email`, `web3`, `x`).
The **Delete** button allows you to remove linked accounts, but note that a user must always have at least one login method remaining connected to their profile. Consequently, the **Delete** button will not be displayed next to the last remaining account.
### Entries section
Shows a list of all campaigns within your organization that this user is participating in (as a test user or regular user).
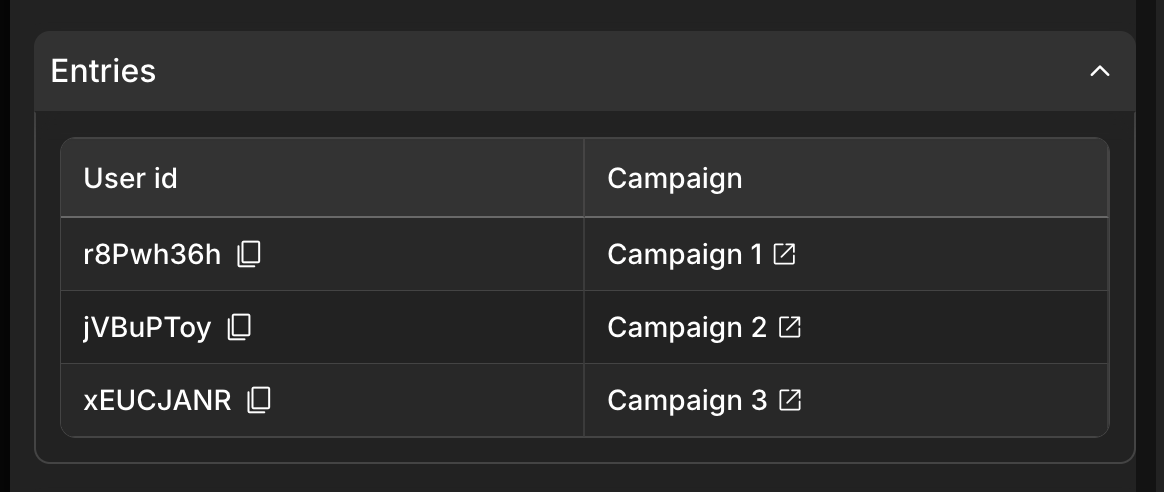 * **User ID**: The user's ID within that specific campaign context.
* **Campaign**: The name of the campaign.
Clicking on a campaign name in this list opens that specific campaign's dashboard or settings in a new browser tab. This can be useful if a test user is part of multiple campaigns and you need to navigate between them.
### Deleting a test user
Removing individual logins (as described in the Logins section) is different from removing the user entirely from the test group. If you need to completely remove a test user:
1. Scroll to the very bottom of this drawer till you find a red **Delete from test users** button.
2. Click this red button to remove the user from the test group for this campaign. You will be asked to confirm this action.
If you remove a test user and later decide to add them again, you must repeat the full invitation process from the beginning: the user needs to provide their current User ID, you need to invite them again, and the user must confirm the new invitation.
* **User ID**: The user's ID within that specific campaign context.
* **Campaign**: The name of the campaign.
Clicking on a campaign name in this list opens that specific campaign's dashboard or settings in a new browser tab. This can be useful if a test user is part of multiple campaigns and you need to navigate between them.
### Deleting a test user
Removing individual logins (as described in the Logins section) is different from removing the user entirely from the test group. If you need to completely remove a test user:
1. Scroll to the very bottom of this drawer till you find a red **Delete from test users** button.
2. Click this red button to remove the user from the test group for this campaign. You will be asked to confirm this action.
If you remove a test user and later decide to add them again, you must repeat the full invitation process from the beginning: the user needs to provide their current User ID, you need to invite them again, and the user must confirm the new invitation.